
Article Overview#
This is Part 2 of the Gentoo Linux Installation Guide series: Desktop Configuration.
Series Navigation:
- Basic Installation: Install the Gentoo base system from scratch
- Desktop Configuration (this article): Graphics drivers, desktop environments, and input methods
Previous article: Basic Installation
12. Post-Reboot Configuration#
You have completed the Gentoo base installation and entered the new system's TTY.
Apply the following configuration as needed. Select the appropriate configuration and packages for a server, desktop productivity, gaming, or other use case.
Important: Run commands as the correct user
Run the system-administration commands in this article as
root, including Portage, service configuration, and operations under/etc. From the unprivileged user, switch to a root shell:su -Run commands containing
--user, includingflatpak --userandsystemctl --user, as the unprivileged user who will use the desktop.
Important: Check the profile and update the system
Before configuring the system, confirm that the selected profile is correct and update the system:
eselect profile list          # List all available profiles
eselect profile set <number>    # Set the selected profile (for example, desktop/plasma/systemd)
emerge -avuDN @world          # Update the system
Configure graphical and multimedia functionality.
12.0 Network Check [Required]#
After logging in, confirm that the network connection works.
- Wired network: It usually connects automatically.
- Wireless network: Use
nmtui(NetworkManager) oriwctl(iwd) to connect to Wi-Fi.
12.1 Global Configuration (make.conf) [Required]#
Reference: make.conf
/etc/portage/make.conf is Gentoo's global configuration file. At this stage, configure only the graphics card, input devices, and localization options; the desktop profile provides the wayland, X, pipewire, pulseaudio, and alsa flags needed for desktop environments by default, so they do not need to be set in make.conf.
vim /etc/portage/make.confAdd or modify the following:
# Graphics driver (select for your hardware)
VIDEO_CARDS="nvidia"        # NVIDIA
# VIDEO_CARDS="amdgpu radeonsi" # AMD
# VIDEO_CARDS="intel" # Intel
# Input devices
INPUT_DEVICES="libinput"
# Localization
L10N="en zh zh-CN zh-TW"
LINGUAS="en zh_CN zh_TW"
12.2 Apply Configuration and Update the System [Required]#
Apply the new USE flags:
emerge --ask --newuse --deep @world12.3 Graphics Drivers [Required]#
Reference: NVIDIA/nvidia-drivers · NVIDIA/nvidia-drivers (English) · AMDGPU · Intel
- NVIDIA proprietary driver:
emerge --ask x11-drivers/nvidia-drivers - AMD: Set
VIDEO_CARDS="amdgpu radeonsi" - Intel: Set
VIDEO_CARDS="intel". Modern Intel graphics cards only needintel; Mesa uses it to build the corresponding drivers. Only very old generations needi915.
Configure VAAPI hardware video acceleration
Reference: VAAPI · nvidia-vaapi-driver
Enable VAAPI globally: Add
vaapito theUSEvariable in/etc/portage/make.conf.# Rebuild affected packages emerge --ask --changed-use --deep @worldInstall the driver and tools:
emerge --ask media-video/libva-utils # Install vainfo for verificationNVIDIA users must accept its testing keyword before installing the driver:
mkdir -p /etc/portage/package.accept_keywords
echo 'media-libs/nvidia-vaapi-driver ~amd64' > /etc/portage/package.accept_keywords/nvidia-vaapi-driver
emerge --ask media-libs/nvidia-vaapi-driver
Note
nvidia-vaapi-driver may be unstable under Wayland, for example because of CUDA/OpenGL interoperability issues.
See NVIDIA Forums, Reddit, and GitHub Issue.
NVIDIA users must also enable DRM KMS in the kernel parameters:
Edit /etc/default/grub and add nvidia_drm.modeset=1 to GRUB_CMDLINE_LINUX_DEFAULT.
grub-mkconfig -o /boot/grub/grub.cfgIntel/AMD users: Support is usually available after installing the graphics driver.
- Verify:
Run
vainfo. If it returns no errors and lists supported profiles, the configuration is active.
Firefox hardware acceleration
- The system
ffmpegprimarily provides software decoding for formats such as H.264, AAC, HEVC, and MP3. - Firefox, especially
firefox-bin, bundles FFmpeg libraries and does not automatically use NVDEC/NVENC supplied by the system FFmpeg for hardware decoding. - Visit
about:supportto check Firefox's actual hardware-acceleration status.
NVIDIA Chromium hardware acceleration (recommended; no VAAPI required)
The following configuration applies to Chromium, Chrome, Edge, and Electron applications such as VSCode.
Method 1: Use a flags configuration file (recommended)
This method does not require modifying .desktop files, so the browser can still be recognized correctly as the default browser.
1. Environment variables
Create ~/.config/environment.d/chromium-nvidia.conf:
# NVIDIA environment variables
__GLX_VENDOR_LIBRARY_NAME=nvidia
__VK_LAYER_NV_optimus=NVIDIA_only
GBM_BACKEND=nvidia-drm
2. Chromium/Chrome flags configuration
Create the appropriate flags file:
- Chrome Stable:
~/.config/chrome-flags.conf - Chrome Unstable:
~/.config/chrome-dev-flags.conf - Chromium:
~/.config/chromium-flags.conf - Edge Beta:
~/.config/microsoft-edge-beta-flags.conf - Edge Dev:
~/.config/microsoft-edge-dev-flags.conf
Contents:
# Vulkan video acceleration configuration
# NVIDIA hardware acceleration optimization
--enable-features=Vulkan,DefaultANGLEVulkan,VulkanFromANGLE
--enable-unsafe-webgpu
--ozone-platform=x11
Note: If you encounter the following error:
'--ozone-platform=wayland' is not compatible with Vulkan.
Consider switching to '--ozone-platform=x11' or disabling Vulkan
use
--ozone-platform=x11. Wayland does not currently support Vulkan hardware acceleration.
3. Apply the configuration
Sign out and back in for the configuration to take effect.
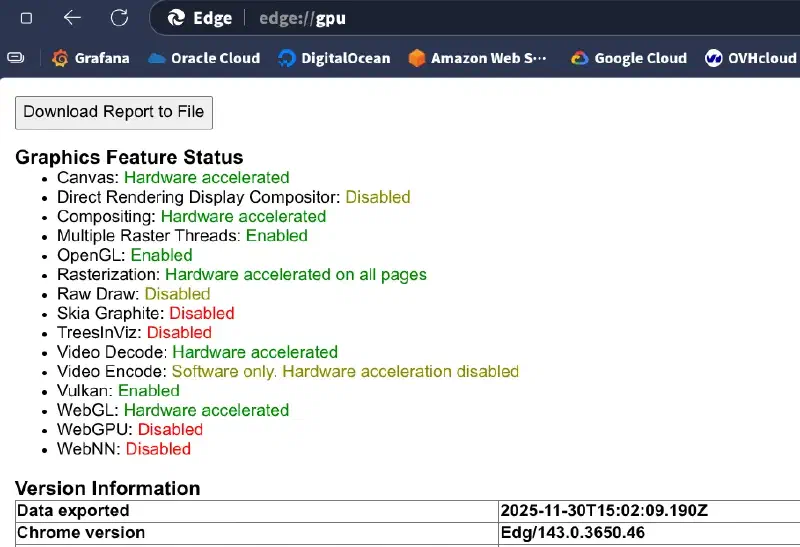
Verify: Visit
chrome://gpu/oredge://gpu/and confirm that Vulkan isEnabled.
12.4 Audio and Bluetooth [Optional]#
Reference: PipeWire · Bluetooth · PipeWire (English) · Bluetooth (English)
# Install the PipeWire audio system and WirePlumber session manager
emerge --ask media-video/pipewire media-video/wireplumber
# Install the Bluetooth stack, tools, and manager (Blueman is the GUI manager)
emerge --ask net-wireless/bluez net-wireless/bluez-tools net-wireless/blueman
Start the services (OpenRC)
# As the regular desktop user, enable PipeWire and WirePlumber
rc-update add -U pipewire default
rc-update add -U pipewire-pulse default
rc-update --user add wireplumber default
# Enable and start the Bluetooth system service
rc-update add bluetooth default
/etc/init.d/bluetooth start
Start the services (systemd)
# Enable the Bluetooth service (system level)
sudo systemctl enable --now bluetooth
# Enable WirePlumber's systemd USE flag
echo "media-video/wireplumber systemd" >> /etc/portage/package.use/pipewire
# Rebuild PipeWire and WirePlumber for the changed USE flag
emerge --ask --changed-use media-video/pipewire media-video/wireplumber
# Enable the PipeWire PulseAudio compatibility socket
systemctl --user enable --now pipewire-pulse.socket
# Enable the WirePlumber session manager
systemctl --user enable --now wireplumber.service
12.5 Desktop Environments and Display Managers [Optional]#
KDE Plasma (Wayland)#
Reference: KDE · KDE (English)
# Install the Plasma desktop
emerge --ask kde-plasma/plasma-meta
# (Optional) Install the complete KDE application suite
emerge --ask kde-apps/kde-apps-meta
# Install the SDDM display manager
emerge --ask x11-misc/sddm
OpenRC configuration
# Install the generic display-manager init script
emerge --ask gui-libs/display-manager-init
# Configure SDDM
sed -i 's/^DISPLAYMANAGER=.*/DISPLAYMANAGER="sddm"/' /etc/conf.d/display-manager
sed -i 's/^CHECKVT=.*/CHECKVT=7/' /etc/conf.d/display-manager
# Enable SDDM
rc-update add display-manager default
rc-service display-manager start
systemd configuration
# Enable SDDM
systemctl enable sddm
systemctl start sddmGNOME#
Reference: GNOME · GNOME (English)
emerge --ask gnome-base/gnome # Install GNOME core components
emerge --ask gnome-base/gdm # Install the GDM display manager
# OpenRC: install the generic display-manager init script
emerge --ask gui-libs/display-manager-init
# OpenRC: configure GDM
sed -i 's/^DISPLAYMANAGER=.*/DISPLAYMANAGER="gdm"/' /etc/conf.d/display-manager
# OpenRC: enable and start GDM
rc-update add display-manager default
rc-service display-manager start
systemctl enable gdm # Enable the GDM display manager (systemd)
Hyprland (Wayland dynamic tiling window manager)#
Reference: Hyprland
Hyprland is in the hyproverlay overlay, not the main Portage tree. Enable the overlay, accept its keywords, and then install it:
emerge --ask app-eselect/eselect-repository
eselect repository enable hyproverlay
emaint sync -r hyproverlay
# Hyprland and its dependencies use the ~amd64 keyword; accept the overlay's keyword
mkdir -p /etc/portage/package.accept_keywords
echo '*/*::hyproverlay' > /etc/portage/package.accept_keywords/hyproverlay
emerge --ask gui-wm/hyprland
Hyprland depends on recent Wayland and graphics-driver versions. See the Gentoo Wiki for detailed configuration.
Other Desktop Environments#
Consider Xfce or LXQt for a lightweight desktop environment:
- Xfce:
emerge --ask xfce-base/xfce4-meta(Chinese Wiki; English Wiki) - LXQt:
emerge --ask lxqt-base/lxqt-meta(Wiki)
More desktop environments
See Desktop environment or the English page for other desktop environments.
12.6 Localization and Fonts [Optional]#
Reference: Localization/Guide · Fonts
Install Chinese fonts to display Chinese correctly.
# Install Noto CJK (Source Han) fonts
emerge --ask media-fonts/noto-cjk
# Install Emoji fonts
emerge --ask media-fonts/noto-emoji
# (Optional) WenQuanYi Micro Hei
emerge --ask media-fonts/wqy-microhei
Install the following packages for broader script coverage and coding fonts:
# Noto fonts (covers many languages including Arabic, Hebrew, Cyrillic, Indian scripts, Thai)
emerge --ask media-fonts/noto
# Coding fonts
emerge --ask media-fonts/jetbrains-mono
# DejaVu (widely used for Hebrew, Arabic, Cyrillic)
emerge --ask media-fonts/dejavu
Refresh the font cache:
fc-cache -fv12.7 Input Method Configuration (Fcitx5 and Rime) [Optional]#
Rime is an input-method engine that supports Luna Pinyin (Simplified/Traditional), Bopomofo, Terra Pinyin, and other input schemas. It also supports Chinese, Japanese, Korean, Vietnamese, and other languages through installable schemas. When using Wayland, configure the following environment variables.
Option A: Fcitx5 + Rime (recommended for KDE and general environments)
Suitable for KDE Plasma, Hyprland, and similar environments.
Install
emerge --ask app-i18n/fcitx app-i18n/fcitx-rime app-i18n/fcitx-configtool app-i18n/fcitx-gtk app-i18n/fcitx-qtConfigure environment variables (Wayland)
Reference: Using Fcitx 5 on Wayland · English page
Edit /etc/environment:
vim /etc/environmentAdd the following:
# Force XWayland applications to use Fcitx5
XMODIFIERS=@im=fcitx
# (Optional) For non-KDE environments or specific applications
GTK_IM_MODULE=fcitx
QT_IM_MODULE=fcitx
KDE users
In KDE Plasma 5.27+, select Fcitx 5 directly in System Settings → Keyboard → Virtual Keyboard. Other than XMODIFIERS, you do not need to set the preceding environment variables manually.
Start
- KDE and GNOME usually start it automatically.
- Hyprland: add
hl.on("hyprland.start", function() hl.exec_cmd("fcitx5 -d") end)to~/.config/hypr/hyprland.lua. - Sway: add
exec fcitx5 -dto its configuration file.
Option B: IBus + Rime (recommended for GNOME)
Reference: IBus
GNOME has the best integration with IBus. When using GNOME, prefer IBus.
Install
emerge --ask app-i18n/ibus-rimeEnable
In GNOME Settings, open Keyboard, add an input source, and select "Chinese (Rime)". The selector may require choosing Other and searching for Rime.
Rime configuration tips
- Switch schemas: Press
F4. - Supported schemas: Luna Pinyin (Simplified/Traditional), Bopomofo, Terra Pinyin, and others. Japanese (Hiragana), Vietnamese, Cantonese, and additional schemas are available from the Rime schema repository.
- User configuration directory:
~/.local/share/fcitx5/rime(Fcitx5) or~/.config/ibus/rime(IBus).
12.8 Secure Boot [Optional]#
Reference: Secure Boot
When Secure Boot is required, Gentoo recommends sbctl to simplify the configuration.
- Install sbctl and efitools:
emerge --ask app-crypt/sbctl app-crypt/efitools - Back up existing Secure Boot keys before entering Setup Mode:
Setup Modeclears existingPK,KEK,db, anddbxkeys. Run:Copymkdir -p /root/secure-boot-key-backup efi-readvar -v PK -o /root/secure-boot-key-backup/PK.esl efi-readvar -v KEK -o /root/secure-boot-key-backup/KEK.esl efi-readvar -v db -o /root/secure-boot-key-backup/db.esl efi-readvar -v dbx -o /root/secure-boot-key-backup/dbx.esl/root/secure-boot-key-backupto offline storage and confirm that it contains all four.eslfiles. Do not enter Setup Mode until the backup is verified. Removing manufacturer or Microsoft keys can prevent video output on some hardware. - Enter the BIOS setup: Restart into the BIOS. Set Secure Boot mode to "Setup Mode" (which clears existing keys), then enable Secure Boot.
- Confirm that Setup Mode is enabled:The output must contain
sbctl statusSetup Mode: Enabled. If it showsDisabled, return to step 3. - Create keys:
sbctl create-keys - Configure Secure Boot and kernel-module signing:
Edit
/etc/portage/make.conf:Add:vim /etc/portage/make.confConfirm that the kernel enablesUSE="${USE} secureboot modules-sign" MODULES_SIGN_KEY="/var/lib/sbctl/keys/db/db.key" MODULES_SIGN_CERT="/var/lib/sbctl/keys/db/db.pem" SECUREBOOT_SIGN_KEY="/var/lib/sbctl/keys/db/db.key" SECUREBOOT_SIGN_CERT="/var/lib/sbctl/keys/db/db.pem"CONFIG_MODULE_SIG=y, then run:emerge --ask --newuse --deep @world - Enroll keys:
sbctl enroll-keys -m # -m includes Microsoft keys (recommended; without them, Windows may not boot or some firmware may not load) - Sign the kernel and bootloader:
Use
sbctl sign-allto sign all registered files:sbctl sign-all - Verify the signature status of every file:
sbctl verify - Confirm Secure Boot after restarting:The output must contain
sbctl statusSecure Boot: EnabledandSetup Mode: Disabled.
12.9 Portage Git Sync and Overlays [Optional]#
Why is this step needed?
The default rsync sync is slow. Git sync is faster and easier to manage.
1. Install Git
emerge --ask dev-vcs/git2. Configure Git sync
mkdir -p /etc/portage/repos.conf
cp /usr/share/portage/config/repos.conf /etc/portage/repos.conf/gentoo.conf
Change only the sync type and URI in the copied template:
sed -i -e 's/^sync-type = .*/sync-type = git/' -e 's|^sync-uri = .*|sync-uri = https://github.com/gentoo-mirror/gentoo.git|' /etc/portage/repos.conf/gentoo.confAvailable Git mirrors:
- Beijing Foreign Studies University:
https://mirrors.bfsu.edu.cn/git/gentoo-portage.git - Tsinghua University:
https://mirrors.tuna.tsinghua.edu.cn/git/gentoo-portage.git - GitHub (outside China):
https://github.com/gentoo-mirror/gentoo.git
3. Add the Gentoo-zh overlay
Create gentoo-zh.conf in /etc/portage/repos.conf/ with the following content:
[gentoo-zh]
location = /var/db/repos/gentoo-zh
sync-type = git
sync-uri = https://github.com/microcai/gentoo-zh.git
auto-sync = yes
Available gentoo-zh Git mirrors (optional):
- Original source (GitHub):
https://github.com/microcai/gentoo-zh.git - Chongqing University:
https://mirrors.cqu.edu.cn/git/gentoo-zh.git - Nanjing University:
https://mirror.nju.edu.cn/git/gentoo-zh.git
gentoo-zh distfiles mirrors (optional):
To accelerate package downloads from the gentoo-zh overlay, use one of these distfiles mirrors:
- Original source:
https://distfiles.gentoocn.org/ - Chongqing University:
https://mirror.cqu.edu.cn/gentoo-zh - Nanjing University:
https://mirror.nju.edu.cn/gentoo-zh
Instructions: https://t.me/gentoocn/56
Important (updated 2025-10-07) Gentoo's announcement states that Gentoo has stopped providing cache-enabled mirror support for third-party repositories. From 2025-10-30, mirror configurations for all third-party repositories, including gentoo-zh, will be removed from the official repository list.
Effects:
- Tools such as
eselect repositoryandlaymancontinue to work. - Gentoo no longer provides cache-enabled mirrors; synchronization now uses the upstream source, GitHub, directly.
- Official repositories (
::gentoo,::guru,::kde, and::science) are unaffected and can still use mirrors.
If you have added the gentoo-zh overlay, update its sync URI:
# List installed repositories
eselect repository list -i
# Remove the old configuration
eselect repository remove gentoo-zh
# Re-enable it (the correct upstream source will be selected automatically)
eselect repository enable gentoo-zh
Official announcement: Cache-enabled Mirrors Removal
4. Sync
emerge --sync5. Installation example
Use flclash-bin as an example:
emerge -pv flclash-binDependency resolution output changes as the overlay is synced. Confirm that the packages, versions, dependencies, and download sizes listed by emerge -pv flclash-bin are expected.
After confirming that the output is correct, install it:
emerge --ask flclash-bin12.10 Flatpak Support and Software Centers [Optional]#
Reference: Flatpak
If you need Flatpak or want to manage Flatpak applications through a software center:
Install Flatpak
emerge --ask sys-apps/flatpakEnable software-center support
To make GNOME Software or KDE Discover support Flatpak, enable the appropriate USE flag.
GNOME users: GNOME Software is currently available only with the
~amd64testing keyword. Accept this keyword only if you accept testing versions for this package. Add the following to/etc/portage/package.accept_keywords/gnome-software(create the file if it does not exist):gnome-extra/gnome-software ~amd64Add the following to
/etc/portage/package.use/gnome(or create the file):gnome-extra/gnome-software flatpakKDE users: Add the following to
/etc/portage/package.use/kde(or create the file):kde-plasma/discover flatpakUpdate the software center
# GNOME
emerge --ask --newuse gnome-extra/gnome-software
# KDE
emerge --ask --newuse kde-plasma/discover
Usage
Flatpak can install proprietary software such as QQ and WeChat. Its sandbox isolates applications from the host system.
Run the following flatpak --user commands as the unprivileged user who will use the desktop, not as root:
# Add the Flathub remote
flatpak remote-add --user --if-not-exists flathub https://flathub.org/repo/flathub.flatpakrepo
# Search for applications
flatpak search qq
flatpak search wechat
# Install QQ and WeChat
flatpak --user install flathub com.qq.QQ
flatpak --user install flathub com.tencent.WeChat
12.11 System Maintenance (SSD TRIM and Power Management) [Optional]#
1. SSD TRIM (extend SSD lifespan)
Reference: SSD
Running TRIM regularly maintains SSD performance.
Check support
Run lsblk --discard. If the DISC-GRAN column is non-zero, TRIM is supported.
systemd users:
systemctl enable --now fstrim.timerOpenRC users:
Run
fstrim -avmanually once a week, or configure a cron job.
2. Power management (recommended for laptops)
Reference: Power management/Guide · English page
Choose one of the following; do not install both.
Option A: TLP (recommended; power saving)
It automatically optimizes battery life and suits most users.
emerge --ask sys-power/tlp
# OpenRC
rc-update add tlp default
/etc/init.d/tlp start
# Systemd
systemctl enable --now tlp
Configuration
TLP's default configuration is usually sufficient. For fine-tuning, use /etc/tlp.conf. Run tlp start after making changes.
Option B: power-profiles-daemon (desktop integration)
GNOME and KDE users can switch between Performance, Balanced, and Power Saver modes from the system menu.
emerge --ask sys-power/power-profiles-daemon
# OpenRC
rc-update add power-profiles-daemon default
/etc/init.d/power-profiles-daemon start
# Systemd
systemctl enable --now power-profiles-daemon
3. Zram (memory compression)
Zram
Zram creates a compressed memory swap partition and can reduce the risk of out-of-memory (OOM) conditions when compiling large software packages.
OpenRC users:
emerge --ask sys-block/zram-init
rc-update add zram-init default
Configuration is in /etc/conf.d/zram-init.
systemd users:
Use zram-generator:
emerge --ask sys-apps/zram-generator
# Create a configuration that uses 50% of memory as swap
cat <<'EOF' > /etc/systemd/zram-generator.conf
[zram0]
zram-size = ram / 2
EOF
systemctl daemon-reload
systemctl start dev-zram0.swap